Available to all clients on version 7.21.2 and above.
You can set automated text and email messages to send to your patients before and after their dental appointments. These messages remind patients of what to do before their visit or give instructions after their procedure. You can create as many messages as you need and attach them to certain procedure codes or code categories.
✅Note: Only Administrative Users can configure this setting. See how to update user preferences in this guide: How Do I Change User's Permissions?↗️
Access Settings
- Log into Flex as an Administrative User.
- In the upper left corner of the Flex Homepage click Settings.
- Select the Text & Emails tab.
- In the panel on the left, find Pre And Post Op.
Setup Message Types
- In the Texts & Emails Pre And Post Op message settings, click New Message.
- Select procedure codes and/or categories from the drop-down menu.
- ⭐Pro Tip: Link specific codes for precise coverage (for example: D7140, D7210, D7230 — D7250). If you'd rather cover a full set of procedure codes, choose the category instead, like "Oral Surgery".
- Choose a message type using the radio button:
- Pre Op
- Post Op
- Pre Op and Post Op
- Give this message a title to keep things organized. Only your team can see your titles.
- Choose how to send a message. If the message will be sent by email, provide a subject line. Options are:
- Text
- Email and text
-
✅Note: Default messages are ready to use. Select Edit Message to customize messages sent to your patients. Templates appear in blue after you make a selection.
-
✅Note: Default messages are ready to use. Select Edit Message to customize messages sent to your patients. Templates appear in blue after you make a selection.
- Use the arrows or type a number to set the number of days before the appointment the message(s) will be sent.
- Set the time of day to send the message using the drop-down menu.
- If Pre Op and Post Op is selected, complete setup for both message types.
- Click Save Configuration.
Manage Message Types 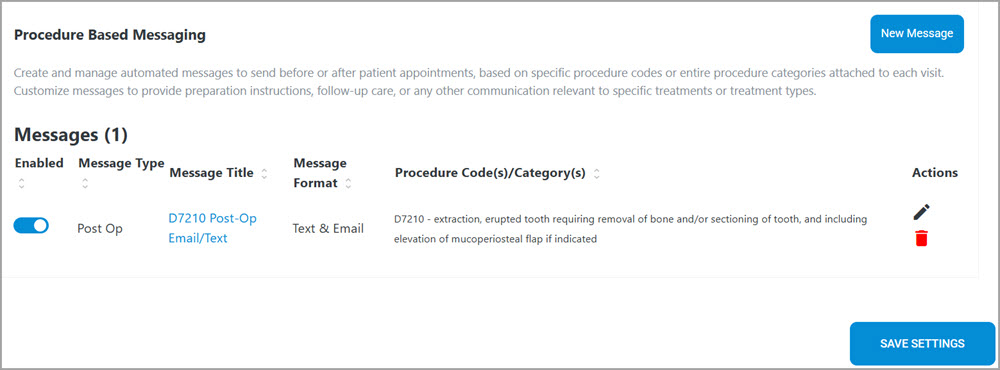
- Click the arrows next to each title to sort message types by:
- Enabled or disabled
- Pre or post op
- Title
- Text or email
- Code/category.
-
Enable a message type by clicking the toggle to the on position (blue). All message types are enabled by default after creation.
-
Save changes in the bottom right.
-
Save changes in the bottom right.
-
Disable a message type by toggling to the off position (gray).
-
Save when finished.
-
Save when finished.
-
Edit a message type using the pencil icon.
- In the lower left corner of the edit window, click the Save Changes button to update the message.
- In the lower left corner of the edit window, click the Save Changes button to update the message.
-
Delete a message type using the trash icon.
⚠️A warning appears: “Are you sure you want to delete this message configuration? This action cannot be undone.”
You can update, edit, or delete messages at any time to keep your communications accurate and up to date. Automated messages delivered at the right time help improve the patient experience and streamline office workflows. Once saved, there is no need to send manual reminders or follow-up messages, your patients will receive the right information according to the schedule set.
✅Note: Text reminders for pre-med patients are part of your Timeline, check out our text guide here: Text Reminders↗️
Looking for More?
To learn more about procedure based features, check out these resources:
➡️How Do I Send Post-Op Forms?
You are all set!
If you found this information helpful, please like and/or comment below!
If you have questions, please contact Flex Support.
Thank you!
Comments
Please sign in to leave a comment.